Tag Archives: pulse

DoReMi Piano

Announcing the launch of the brand new solfa piano method for young beginners based on the Kodály Approach.

DoReMi Piano Book 1 covers technique for the young beginner; pulse, rhythm and pitch understanding; simple pentatonic songs learn first as games and then on a simplified stave. By the end of Book 1 the student will also have an understanding of time signatures, bars, dynamics and slurs.

Why not check it out

http://doremipiano.co.uk

Solfa Challenge Level 3

Once my students have achieved the Solfa Challenge Level 2 they should be able to perform a collection of simple songs and rhymes, show the pulse and shape of the pitch and also record these two things in a fairly rough and ready way. In Level 3 we will expand on this and start to introduce the concept of quavers. Again, my ideas have come directly or been inspired by Cyrilla Rowsell and David Vinden’s Jolly Music.

Level 3 is split into three sections as you can see from the Solfa Challenge – Level 3 Chart

Section 1 – I can play…

I can play Patacake

I have mentioned before that some students will tap the rhythm instead of the pulse, or some hybrid of the two. I have found playing patacake can help with this. It gives a very visual and kinesthetic guide from the teacher. My own youngest son still manages to patacake the rhythm though, and gets very cross with me when I’m not in sync with him. Still, he is only 5 so there’s time.

I can play the Radio Game

This game is fabulous. Basically you have one person as the radio controller and the others as the singers. You agree on a signal (like opening and closing the hand) for the controller to tell the singers whether the radio is ON or OFF. The singers must sing the song while the radio is on and then be silent when the radio is off. Initially you may want to sing most of the song ON and just turn it OFF for the last line or few words. The tricky bit is when you turn it off and on again in the same song. The singers must continue the song in their thinking voices (silently in their heads) and start singing again at the right place. Some students will start again on the next word as if a CD has been paused, not a radio being muted.

It’s such a brilliant way of practising keeping a steady beat and working on the thinking voice.

I can play Pass The Song

I love this game and my Infant School Choir love playing it too. Basically you split into groups. In a piano lesson it might be just the teacher and the student. Without missing a beat you must perform a song, taking it in turns to sing. Start easy and sing the entire song before passing. Then try singing a phrase each, and finally a beat each. Some students will have trouble with the beat option. They will try and sing a word each. They could use their pulse pictures they will create in Section 3 below, and tap along the hearts with their fingers to help.

Section 2 – I can play on the keys

For each of the four songs we have been working with, the student plays them by ear on the black keys. You can show them how to find the right black keys for so and mi by showing them the “gaps” on the keyboard. Once they can do that confidently they can extend it to white keys starting on C, D or G. Moving to different keys not only demonstrates that songs can be sung in different keys (transposed) and also encourages them to use their ears to find that second lower pitch. Although I have had students who realised they could just count the semitones – which I guess is another useful skill!

It is vital that the students are comfortable singing the songs accurately and that they understand that the songs use two pitches. A high pitch and a low pitch. They need to build on the work they have done mapping the pitch with their hands and on paper to play them accurately on the piano. Many will just alternate pitches on each word instead of each beat (which is the case for these songs but not future ones) so coming off the bench and doing regular revision of the up and down arm movements will be required. Slowly and surely is the way to go.

I personally don’t demonstrate this activity to the student, rather I talk them through it and sing a lot to get them to their goal. If I demonstrate it, they pick it up much faster but I’m not sure that it provides the same learning opportunities.

Section 3 – I can record

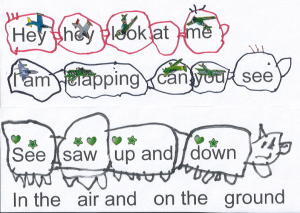
Pulse This starts off very similar to Level 2. We are showing the pulse on paper but this time by writing the words in a set of 8 hearts rather than gluing and sticking. I use a technique I learned from Jolly Music.

1 – The student and teacher sing the song
2 – The student and teacher sing the song and tap the pulse on the hearts
3 – Hopefully the student can now do this on their own
4 – The student taps the hearts and sings in their thinking voice
5 – The teacher taps and the student sings in their thinking voice but the teacher stops on a heart and the student must write the word in the heart
6 – Keep going until all the hearts are full

Make sure you start by filling in all the hearts containing only one word first, then it is easier to fill in the others. If a student keeps getting it wrong you might ask them to sing aloud so you can hear where it’s going wrong. It will probably be that they are singing a single word for each beat rather then keeping with the rhythm they have learnt.

If they have filled all the hearts and missed off a word in the middle – quite a common error – you can sing their song back to them as they have notated it and see if they realise there is a word missing. Another trick is to stop with one heart to go, talk about how many words we still have to fit in, and they should realise that the final heart needs two words, not one.

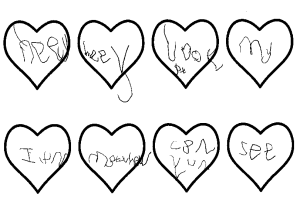
Here is a pulse picture by Matthew (age 5). He changed the words to Hey hey look at me. I am Matthew can you see.

Solfa Level 3 Example 1

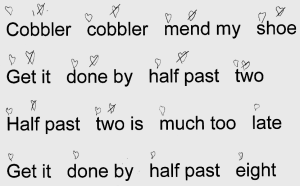
Rhythm Using the same heart beats from the pulse section we can take a look at how many sounds are in each beat. Sometimes there is one sound and sometimes there are two. I start with See Saw as there are only one syllable words to deal with. Cobbler Cobbler can require a little more explanation since Cobbler has two syllables and therefore two sounds.

Next we need to show how we can tap the way the words go, rather than the pulse. So we might have to tap a heart twice if there are two sounds. Hopefully they will know the song well enough to time the taps correctly. When I have done this with older students without the proper preparation we have had some very uneven taps.

Finally we can make crosses underneath the hearts to show which hearts have one and which have two. A confident student may wish to try adding the crosses in the hearts without the stepping stone of the words.

Now we can tap the pulse by tapping the hearts or tap the rhythm (the way the words go) by tapping the crosses. The student can see, hear and feel the difference between pulse and rhythm. An important milestone.

To be continued…

Solfa Challenge Level 2 – Part 2

Here is Part 2 of my guide to my Solfa Challenge Level 2.

Here is a link to Part 1

Level 2 is split into three sections as you can see from the Solfa Challenge – Level 2 Chart. In Part 1 we discussed Sections 1 and 2, I can play and I can show. Here I will describe Section 3 – I can record.

Section 3 – I can record…

We have established in Section 2 that the student can show the pulse and the shape of the pitch with their bodies. Here I ask them to record this. I don’t expect the students to use standard notation at this point. Although many may well be able to.

Instead it’s all about stickers and glue!!

For the pulse I give them a print out of the lyrics (although we can also do this on a white board or hand write it). They then stick a sticker (or make a mark) on the lyrics where the pulse occurs. We work this out by tapping the lyrics with our finger in time with the pulse and work out which word or syllable aligns with the pulse.

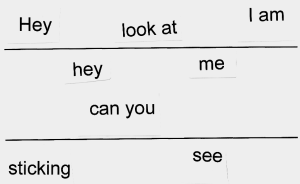
For the pitch, this time their lyric sheet is cut up into pulses. We draw a line across a piece of paper and the words or word pairs are glued on the page, either above the line, or below. You can see for both these activities how vital it is for the student to have a clear grasp of the music from Section 2 before attempting these.

Better than explaining any further, here are some examples of pieces some of my students have done. They are all from quite young children, as my adults and older students do similar activities with whiteboards instead.

5 year old boy

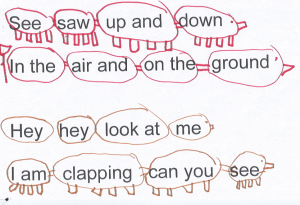
Here is the first attempt at pulse recording from a willful 5 year old boy. In the first example he has made some errors, in the second he insisted each beat get two stickers. Then he personalised his chart with his own imagination. For information, those are pig-trains (don’t ask me!) and each beat is a carriage. Ok so accuracy is missing but he certainly enjoyed the activity and there was certainly plenty of singing!
Solfa Level 2 Example 1

A couple of weeks later, having abandoned the stickers and sticking with the pig-train theme, he produced this. Completely accurate (except that apparently pig-trains have legs). Success!Solfa Level 2 Example 2


7 year old boy

This child is far more serious, he didn’t want to use stickers and instead drew hearts to represent the heart beats of the pulse. You can see where he initially positioned the hearts. We talked about an alien coming down to earth who doesn’t know the song. How will he know where to bang the drum, or clap or time the words? I performed the song the way he had notated it (quite a challenge!) and he immediately grabbed it off me and redid his hearts.
Solfa Level 2 Example 3

Here is this boy’s pitch picture. You can see he put 5 beats on line 1 and 3 on line 2. This gave us an opportunity to talk about phrasing. And again, we did loads of singing!Solfa Level 2 Example 4


Do you have some cute student solfa pictures? Perhaps you could send them to me and I’ll start a gallery! 😀

Here is my guide to Level 3

Solfa Challenge Level 2 – Part 1

Once my students have achieved the Solfa Challenge Level 1 they should be able to perform a collection of simple songs and rhymes. In Level 2 we will start to do more interesting things with these pieces. Here is Part 1 of my guide to Level 2.

Level 2 is split into three sections as you can see from the Solfa Challenge – Level 2 Chart

Section 1 – I can play…

I can play Stand Up Sit Down

This is where the games come in. We play the ever popular Stand Up, Sit Down game from Cyrilla Rowsell and David Vinden’s Jolly Music. The game starts simply and becomes more complex as the student becomes more competent with their pitch awareness. The teacher sings either “stand up” or “sit down, and the student must stand up or sit down! Easy right? The pitches sung either rise from so to do’ (dominant to high tonic or G to high C) for “stand up” and descend from so to do (dominant to low tonic or G to middle C) for “sit down”. The teacher starts each instruction with their hands in the ready position by their chest and either moves them up to their head or down to their waist with the direction of the pitch. You can try and trick the student by singing “stand up” when they are already standing up! They think this is hilarious – if they notice!! For those who don’t notice I put a mischievous grin on my face before I do it to give them some warning.

The benefits of this game are to associate up and down with the different pitches. The children are hearing the pitch change, seeing the arms move, physically responding with their whole bodies and also hearing the instructions.

For the second stage of this game the teacher replaces the lyrics with a “doo” sound. So the children no longer hear the instructions but they still see the arms move and hopefully have started recognising the pitch. My mischievous face is used a bit more here.

Finally we remove the arm movements and the children rely purely on their pitch awareness. If anyone is struggling I might use my face to give them clues until they can do it comfortably.

The children love this game and I am definitely the first to get bored! They especially love being the teacher and it can sometimes be quite a challenge to do what they’re expecting. I want to build their confidence but in the early days with some of the students their pitch can be all over the place. Luckily they think it’s hilarious when I get it wrong!!

I can play Guess the Pitch

The second game can be sung or done on the piano. It’s Guess the Pitch. They don’t have to identify the actual pitch – that would be far too challenging at this level. They just need to identify if the pitch is high or low. Sometimes it’s easier for them to hear it sung, sometimes having the massive extremes of the piano is more helpful. As always the key is to make it really obvious to start with and only move to smaller intervals with the most confident. The aim of the game is to get them to label high pitches as high and low pitches as low.

When I started teaching I was surprised how many students had an issue with this concept. Even one of my most musical 5 year olds had it completely the wrong way round. When I corrected her, she thought I was joking and laughed herself silly! So if a student struggles I give lots of extra verbal clues like “Is this sound high like a tweeting bird or low like a grizzly bear?” Gradually those verbal clues can be removed. Now I’m not surprised, why would a student associate high frequency vibrations with high in the sky and low frequency vibrations with low down? It’s only a shared label, the words don’t actually mean the same! Then we expect them to realise that high in the sky equates to the right of the piano and low is the left – and this is before we even get onto notation! If we need to spend more time on this task then it’s time well spent.

Section 2 – I Can Show…

For this section we use some of the two note so-mi songs we learnt in Level 1. The songs have been taken from Cyrilla Rowsell and David Vinden’s Jolly Music. For each song the student must show the pulse and then the shape of the pitch with their bodies.

I can show the pulse

For Pulse I usually start with Cobbler Cobbler. The students are really familiar with this one as we will have been clapping, tapping and marching the pulse from lesson 1 or 2. They achieve their sticker if they can mark the pulse without help and with a steady beat. The biggest hurdle for this task is stopping the student from tapping the rhythm. Cobbler Cobbler is a good starter because it starts with quavers, where the pulse is crotchets. So if you get them started with a good crotchet pulse then they are more likely to succeed. Contrast that with See Saw or Hey Hey (which we also do at this level) which start with crotchets and then have quavers a couple of words in. With these songs the students may start of tapping the crotchet beat but on the quavers they may tap each quaver – which is actually the rhythm.

Marching is a good way of eliminating this, it’s easier to march the pulse than the rhythm. Also patacake can help them get a good sense of pulse. My own youngest son still manages to patacake the rhythm though, and gets very cross with me when I’m not in sync with him. Still, he is only 5 so there’s time.

I can show the pitch

To show the pitch I just mean to raise or lower the arms as the pitch raises and lowers. Just like we did in Stand Up Sit Down. The teacher should show the pitch with the students initially, until they are ready to do it alone. Ideally to achieve their sticker they should be able to perform it alone, accurately and at a lesson where you haven’t already practised together.

For this I start with Up and Down because the first two pitches are labelled within the lyrics. The pitch of all these two pitch so-mi songs swaps on the beat so the arms will be moving with the beat as well as with the pitch change. To help the students you can sing the song first and work out together if the song starts on a high pitch or low pitch. For this set of songs, they always start on the high pitch. It is important to start with the hands in a neutral “ready position” around chest height. If the students start with their hands high, in anticipation of the first pitch, then they may invert the whole melody!

Section 3 – I can record…

to be continued in Part 2

Express Yourself Vocal Scheme – Key Skills

Following on from the Vocal First Steps we move onto the second phase in my scheme –  Key Skills

We continue to work through the excellent Go for Bronze for musicianship and sight singing, introduce anatomy, further elements of vocal technique and use repertoire to further musical maturity.

Pulse and Rhythm

For students working on Key Skills we continue to practise reading and writing rhythms using stick notation.  So far they have learned crotchets (ta) and quavers (te) but during Key Skills we also add rests and minims (ta-a) to increase the rhythm options available.  We play echo games where I clap a short rhythm and they echo it back.  We also use some simple songs like Cobbler Cobbler from Jolly Music to demonstrate tempo and also some call and response songs to practise keeping the feel of a constant tempo.  Of course any song can be split into lines to create this back and forth feeling.  It’s a great way to get students to sing solo without them feeling under too much pressure.

Learning outcomes for pulse and rhythm

  • The student can clap the rhythm of a known song and identify a song from the rhythm
  • The student can read and notate rhythms with stick notation
  • The student can take over a song without losing the pulse
  • The student can echo short rhythms
  • The student can clap the pulse of their repertoire along to the original recording

Pitch

Key Skills for pitch is all about transferring the pitches so and mi onto the stave.  If so is on a line then mi is on the line below.  If so is on a space then mi is on the space below.  The students start to write the songs they have been learning onto the stave.  A third pitch of la (one tone above so) is also introduced.  These three notes open up so many lovely songs to sing from the Go for Bronze scheme and also from 3-4-5 note songs published by NYCOS.

Learning outcomes for pitch

  • The student can echo a mi-so-la pattern using hand signs
  • The student can sing a known song in solfa and identify a song from solfa
  • The student can read and notate songs on the stave

Anatomy

It is at this level I start to introduce an understanding of anatomy.  I use a combination of ideas from Singing and the Actor by Gillyanne Kayes (referenced as SATA) and images from the internet.  At this level I keep it simple.  We discuss the vocal folds and how they vibrate.  Using our lips to model the vibration and to show that it’s important to use the right amount of breath pressure and also blowing through an elastic band to get it to buzz.  The other term I introduce at this point is the soft palate (there’s a nice image on this site) and how it can move to create oral and nasal sounds.  This leads quite nicely from the work in First Steps that we’ve done on sirens.

Learning outcomes for anatomy

  • The student knows the terms vocal folds, breath pressure, soft palate, nasal port and vibrations
  • The student can open and close their nasal port with their soft palate

Technique

Most of my technique ideas come from Singing and the Actor but another great resource is Jenevora Williams’s Teaching Singing to Children and Young Adults.  Jenevora’s book is useful when you’re teaching children as she has many valuable insights into the child’s voice from birth upwards.  She discusses what is appropriate technique for young and changing voices and has some great images to help with this age range.

Learning outcomes for technique

  • The student understands how false vocal folds create constriction and exercises to deconstrict
  • The student understands how and when to use their neck anchor/trap door
  • The student can model glottal, aspirate and simultaneous onsets

Repertoire

When teaching vocals, especially Pop Vocals, the students often come to their lessons with a list of songs they want to sing.  Often their choices don’t match their abilities and your ideas of where they need to focus their attention.  Rather than stop them singing their choices, I encourage it.  If necessary we have one song I choose and one song they choose.  It can be an eye opener to see how they manage with songs they really care about and know well.  Students who you may have judged to struggle with pitch or range can suddenly surprise you when they know the song inside out already.  Also, any song can be used to develop musicianship and interpretation.

Learning outcomes for repertoire

  • The student can clap the pulse to the original recording, backing track or accompaniment
  • The student can siren the melody
  • The student will discuss the meaning and emotion of the song
  • The student can identify the dynamics of the original recording

What’s next?

Once the student has completed each area in Key Skills they move onto Initial. Of course sometimes they’ll excel in one area and I certainly don’t hold them back while we get all the areas up to the same level.  Remember this is just a framework.

Look out for my blog post on Initial.  If you teach piano you may be interested in my Piano Scheme.

Express Yourself Piano Star Scheme – Initial

For the students who’ve completed their red Key Skills star on the Express Yourself Piano Star Scheme it’s now time for orange!!  I hand them their orange Initial star and they proudly stick it to my music room wall.

In the Express Yourself Piano Star Scheme the stars are colour coded and go up by level.  The orange Initial star is the third in the scheme and it is for students who have finished their Level 1 tutor book. Depending on their playing level you may be in the early stages of preparation for an Initial level.  Exams at this level include Trinity Initial, LCM Step 1 or 2, ABRSM Prep Test, Trinity Rock and Pop Initial, and Rockschool Debut. It’s such a minefield of information so here is a blog post briefly covering exams.

So what do I include at Initial Level?

Pitch

There are lots of different songs in Jolly Music that just use two or three pitches.  They start with so and mi, then add la or do.  Many you will recognise from childhood, some you won’t.  Other sources of songs with these pitches are Songs for Singing &​ Musicianship Training by David and Yuko Vinden.  Along with arm movements, with or without the solfa hand signs, the students develop their idea of high and low pitches.  Once they’ve learnt several of these songs, I challenge them to write their own with their own lyrics.  They can sing it first and then work it out on the piano using black keys, or vice versa.

To help the students sing the final tonic note of a melody I often play their pieces and don’t play the final note.  The student then has to sing the note.  It is important to establish the comfort range of the student and then ensure the final note sits within this range.  If not, then the student may have difficulty pitching it.

Learning outcomes for pitch

  • The student can play known do-mi-so-la songs by ear
  • The student can echo (singing or playing) short do-mi-so-la patterns with solfa hand signs
  • The student can identify if two melodies are the same or different
  • The student can identify which of three pitches is the highest or lowest
  • The student can sing the final tonic note from their pieces, songs or a new melody
  • The student can transpose a memorised piece (no black notes) for example Star Wars

Pulse and rhythm

The excellent musicianship scheme Go for Bronze has taught me a great new way of clapping the pulse. I had always clapped, and used a louder clap for the first beat of the bar.  But in Go for Bronze they clap and click.  The clap comes on the first beat of the bar and the clicks on the other beats.  If the student can’t click they can always tap their knees instead. It works so well because there’s more movement so they can really feel the difference between the beats.  And as a teacher you can see they’ve got the hang of it!

Learning outcomes for pulse and rhythm

  • The student can clap or clap and click a steady beat in three time and four time
  • The student can track written music being played by their teacher
  • The student can echo a simple rhythm
  • The student can clap the rhythm of a familiar piece and march the pulse at the same time
  • The student can create rhythm pictures of known songs and translate them into stick notation
  • The student knows the rhythm names for ta and te te and can read stick notation

Dynamics and articulation

At this stage students should be refining their dynamic control, and also their memory!  Hopefully at this point you won’t need to remind them beforehand, or use the high frequency phrase “That was lovely Jimmy, now try with …”!  They will also have started working on staccato and legato.  Some students will have been playing legato automatically, but those who have been playing detached will now need to learn two new techniques.

Learning outcomes for dynamics and articulation

  • The student can identify, by listening, whether a melody is played forte (loud) or piano (soft)
  • The student can identify, by listening, whether a melody is played mostly staccato or legato
  • The student plays their pieces with some dynamics and articualation without reminders

Technique

You may have noticed that there isn’t a technique point on the star charts.  This is because technique is an ongoing journey.  It’s harder to “tick it off”.  My students aren’t aware that there are milestones to achieve.  Where appropriate I do give them temporary targets.  We can cover technique issues through repertoire and technique exercises from their Piano Adventures Technique & Artistry books. However I also use scales exercises to practise technique.

Learning outcomes for technique

  • The student knows that they should play with a rounded hand shape
  • The student knows that they should play using their fingertips and side edge of their thumb
  • The student knows that they should play with a relaxed wrist
  • The student knows that they should play staccato with a light hand bounce
  • The student knows that their fingers and thumbs should play evenly

Scales and chords

At Initial level the student will learn the same five note scale and arpeggio patterns as before, but now including minor keys and hands together.  As I mentioned in the technique section these patterns can be used for so many things.  They can play them staccato or legato to help with articulation control.  They can play them forte or piano for improved dynamics.  You can target hand position issues.

At this level I introduce the standard octave fingering for C major and A natural minor and also teach the octave chromatic scale.  I find teaching the chromatic scale in contrary motion can help with fingering.  First we learn them in one direction, outwards from D.  This is by far the easiest direction as you don’t have to remember whether it’s a thumb white note or a finger 2 white note.  Once that’s fully understood we add the inwards direction.  Still hands separately.  Of course we could teach C and Am in contrary motion too, to ensure the fingering in each hand matches.  You will need to judge that on a case by case basis but on the whole I use similar motion for diatonic scales.

Learning outcomes for scales

  • The student can play a pentachord scale and triad in the major keys of C, D, E, F, G and A, and the minor keys of Am, Dm and Em, hands together
  • The student can play an octave scale in the keys of C major and A natural minor hands separately
  • The student can play a chromatic scale in contrary motion from D hands separately
  • The student can identify a pentachord scale or triad as major or minor by listening

Theory

At this point many of my students are working on Ying Ying Ng’s Music Theory for Young Children Book 2. It introduces quavers and expands the known note range.  The main sticking point for students at this point is their speed of response for note reading.  Learning how to use FACE and All Cows Eat Grass is really beneficial but there are only so many worksheets we can produce.  Using online note reading games can really help the students with their reading – see my blog post on the subject.

Learning outcomes for theory

  • The student knows Middle C (C4) to C5 in the treble clef and C3 to Middle C in the bass clef
  • The student understands FACE and All Cows Eat Grass
  • The student understands quavers and their rests
  • The student understands tones, semitones, sharps and flats (but not as key signatures)
  • The student can notate the rhythm of known songs as stick notation

Sight Reading

Sight reading material will be dependent on the level of the student’s repertoire.  We want the sight reading to be much easier than the student’s main pieces.  Resources I use at this level are Improve Your Sight Reading Pre Grade 1 and Sound at Sight Book 1.  However if the student isn’t quite ready, the solfa work on pitch and rhythm helps lay the groundwork for sight singing and sight reading.

Learning outcome for Sight Reading

  • The student is competent at the sight reading examples for Trinity Initial

Improvisation and Composition

My main aim is for students to give improvisation and composition a good go.  We will do a number of activities to practise.  These include compositions based on their pieces, especially blues-based songs; more work with the Scales, Patterns and Improvs Book; creating answers to short musical questions on the black keys or using solfa; creating melodies from do-so baselines and adding do-so baselines to melodies.

Learning outcomes for Improvisation and Composition

  • The student has made a good attempt at composition
  • The student has made a good attempt at improvisation

What’s next?

Once the student has gained a sticker on each point on their orange Initial star they get to keep their completed star.  They also get a certificate and a report which shows how they’ve progressed over the period and a summary of all the skills they’ve gained.  A great milestone on the journey to Grade 1 to show they are progressing. Many of the children take them into school and have them awarded in assembly in the same way as other children have swimming badges and karate certificates.

They then get their yellow Level 1 star to stick on my music room wall.  The learning outcomes for Level 1 will be a topic for a future blog post.

Have I missed anything?  Why not add a comment!
Express Yourself Vocal Scheme – First Steps

Following on from my introduction to the Express Yourself Vocal Scheme

From the very first lesson I start my singing students on this scheme.  I start with the First Steps level for students who may not be confident with pulse, rhythm or pitch.

Which essential musical elements do I work on with beginner students?

Pulse and Rhythm

I start all my singers off with the Go for Bronze scheme published by National Youth Choir of Scotland.  It’s a wonderful scheme for children which uses solfa and the Kodaly Approach to teach notation, theory and sight singing.  The first four “lessons” cover the fundamentals of pulse and rhythm.  Of course depending on the student this could take anything from two lessons to eight or more.  It teaches the student how to feel the pulse of rhymes and chants.  It also covers the difference between pulse and rhythm and introduces crotchets and quavers, although at this point the student is not introduced to those terms.  In keeping with the Kodaly Approach it uses the rhythm names “ta” and “te te”.  By the end of the section the students can read the rhythms using stick notation, which is basically the stems and beams of crotchets and beamed quavers without the note heads – genius!

Learning outcomes for pulse and rhythm

  • The student can march and clap along in time with their teacher
  • The student can describe and demonstrate the difference between pulse and rhythm
  • The student can clap the rhythm of a phrase from stick notation
  • The student can clap the pulse of their repertoire along to the original recording (with help)

Pitch

Go for Bronze then moves onto pitch.  Just two pitches initially (so and mi = scale degrees 5 and 3).  Along with the hand signs they learn to identify which is higher and lower and they map out a song.  These pitches create a minor third and, sung descending, this is the easiest interval to pitch. Just listen to playground taunts and nursery rhymes like Rain Rain Go Away. The students start training their aural skills with these pitches and I don’t add any additional pitches until these are accurately sung.  Students who still have trouble with these pitches will also work on other exercises that I describe in my Singing In Tune blog posts.

Learning outcomes for pitch

  • The student can sing a so-mi pattern in a key of their choosing
  • The student can demonstrate the hand signs for so and mi
  • The student can sing a so-mi melody with rhythm using stick notation

Technique

My technique bible is Singing and the Actor by Gillyanne Kayes (referenced as SATA).  If you want to learn more about good technique then I highly recommend you read the book and attend a Vocal Process retreat where Gillyanne herself takes you through the techniques in the book.  I’m not exaggerating when I say this retreat was invaluable to me and my teaching.  Of course the book covers way more than “First Steps” so here are my priorities.

Learning outcomes for technique

  • The student can warm up their bodies effectively to prepare for singing (SATA Ch.4)
  • The student can demonstrate good breathing technique using the elastic recoil (SATA Ch.4)
  • The student can warm up their modal voice (speech quality) using voiced fricatives combined with the elastic recoil
  • The student can warm up their higher pitches with gentle sirens (SATA Ch.1)
  • The student can attempt to siren their repertoire

Range

Our work on range is less about the achievement of the student, and more about information gathering. There are a number of facts that I need to know in order to choose appropriate repertoire, reasonable starting notes for pitch exercises and to identify areas to develop.  The answers to these questions will vary as time goes on as a result of the work we are doing, and the age of the student.  So these questions need to be revisited again and again.  Future scheme levels won’t make reference to these but they will remain throughout the lessons.

Outcomes for range (to be revisited regularly)

  • The teacher has identified the fundamental speaking pitch of the student
  • The teacher has identified the preferred “so” for the student
  • The teacher has identified the comfort range of the student and their preference for thick or thin vocal folds
  • The teacher has identified the working siren range of the student
  • The teacher has identified the gear changes of the student
  • The teacher has identified the cambiata of the student (male only)

What’s next?

Once the student has completed each area in First Steps they move onto Key Skills.  Of course sometimes they’ll excel in one area and I certainly don’t hold them back while we get all the areas up to the same level.  Remember this is just a framework.

Look out for my blog post on Key Skills.  If you teach piano you may be interested in my Piano Scheme.

Express Yourself Piano Star Scheme – Key Skills

For the students who’ve completed their white First Steps star on the Express Yourself Piano Star Scheme it’s now time for red!!  I hand them their red Key Skills star and they proudly stick it to my music room wall.

Piano Key Skills Star Chart

In the Express Yourself Piano Star Scheme the stars are colour coded and go up by level.  The red Key Skills star is the second in the scheme and it is for students who are just coming to the end of their Primer level tutor book.  They will have been introduced to the stave but not necessarily be confident music readers yet.

So what do I consider to be Key Skills?

Pitch

There is a fabulous game in Jolly Music called “Stand Up, Sit Down” using notes 1, 5 and 8 on the major scale, or do-so-do’ in solfa.  Using ascending so-do’ you sing Stand Up (along with an arm movement) and the student stands up.  Using descending so-do you sing Sit Down (along with an arm movement) and the student sits down.  It helps to train their ear to recognise pitch direction.  Eventually you can remove the lyrics or the hand gestures and ultimately both so they are reacting purely on the pitch.  Either with you singing doo doo, or using the piano or a chime bar.  It’s great to swap roles as well.

Learning outcomes for pitch

  • The student can play Stand Up, Sit Down without any lyrics or arm gestures
  • The student can listen to two pitches and state if the second is higher, lower or the same
  • After listening to a melody, and being shown several written options, the student can select the melody they have heard
  • The student can play a so-mi-la song on black keys or chime bars

Pulse and rhythm

Again using songs from the fabulous Jolly Music we will work on pulse.  We clap, march and bang a djembe along to music, or singing or chanting.  At this level I will be expecting the student to be able to keep a steady pulse without my help.  For some students this is very difficult.  Some can cope with marching but not clapping.  For others it’s the reverse.  The key is plenty of practise and plenty of variety.  When they understand the concept, we can introduce tempo.  At this point there are no tempo changes, it remains static throughout a piece or a rhyme.  We use simple english terms like fast and slow.  There are plenty of examples in Jolly Music of rhymes and songs we can sing at different tempos. We discuss what an appropriate tempo would be for the pieces from their tutor book.  I play their pieces for them at different tempos, sometimes this can be funny, and they choose which they prefer.  Sometimes their preference doesn’t match the title or lyrics of the piece and that can result in interesting discussions.

Learning outcomes for pulse and rhythm

  • The student can march and clap along to a steady pulse on their own
  • The student can demonstrate a steady pulse at a slow tempo or fast tempo
  • The student can track written music being played by their teacher and identify which note their teacher has stopped on
  • After listening to a rhythm, and being shown several written options, the student can select the rhythm they have heard

Dynamics and articulation

Students who have completed their First Steps level will know how much fun it is to play forte and piano.  They should be able to identify whether a piece they are listening to is forte or piano.  Now it’s time to prove they can apply this knowledge to their repertoire.  It may be the whole piece is played at one level.  Or perhaps they are already at the stage where their pieces show a dynamic change.

Learning outcomes for dynamics

  • The student can identify, by listening, whether a melody is played forte (loud) or piano (soft)
  • The student can play their pieces with appropriate dynamics, when reminded

Technique

Now the students have moved past My First Piano Adventures or the Primer and onto the main Piano Adventures series they get a Technique & Artistry book to accompany their lesson book.  It covers technique in a fun way.  Firstly with technique “secrets” which are referenced throughout the book.  Secondly with fun exercises that complement the pieces in the lesson book.  Finally there are artistry pieces where the student is encouraged to play with musicality and feeling.  Even though the technique book covers more, at this stage I focus on good hand position.

Learning outcomes for technique

  • The student knows that they should play with a rounded hand shape
  • The student knows that they should play using their fingertips and side edge of their thumb

Scales and chords

When I started teaching, I didn’t attempt scales with my younger students because of the thumb tucking and finger crossing.  What I didn’t realise was the benefits that can be gained from using pentascales (five note scales).  Initially inspired by the exercises I found when researching Christopher Norton’s American Popular Piano series I started teaching these scales to my students.  Then, thanks to an online forum, I discovered the Scales, Patterns and Improvs Book.  In this book the students do a pentascale pattern which combines the scale, arpeggio and triad.  The advantage of this pattern is the book comes with a CD with some fantastic backing tracks to practise the patterns to.

Another tricky scale to master is the chromatic scale.  I realised that it’s getting past those white note semitones that makes it difficult.  So at this level I introduce what I call a Chromatic Starter.  It starts on F and goes up to B and then returns to F.  The student can practise the thumb and finger three pattern without getting stuck on the “gaps”.

Learning outcomes for scales

  • Using separate hands the student can play a scale, arpeggio and chord pattern in the major keys of C, D, E, F, G and A, from memory without prompting
  • Using separate hands the student can play a chromatic scale between F and B

Theory

Finding the right theory book for a student can be tricky. For very young students I use Ying Ying Ng’s Music Theory for Young Children which is a set of four colourful sticker books which take them from understanding left and right hands, to Grade 1.  For older children and adults it is a bit more difficult.  If they are happy with the sticker books then that’s great.  If they are competent then starting them on Ying Ying Ng’s Music Theory for Young Musicians – Grade 1 is good.  A problem arises when they think the sticker books are too young, but the Grade 1 book is too fast.  For those I use Lina Ng’s My First Theory Book which is a set of three books but doesn’t quite cover everything needed for Grade 1.

Learning outcomes for theory

  • The student can idenfity and name the treble and bass clefs
  • The student can read the notes C to G in the treble clef and G to C in the bass clef
  • The student understands crotchets, minims, dotted minims and semibreves and their rests
  • The student can identify and follow repeat marks
  • The student understands the time signatures 4/4 and 3/4

Sight Reading

While the student has not yet become a confident reader, sight reading work isn’t always possible.  After all, their main pieces are only at the level of the most basic sight reading exercises.  However pulse work (see Pulse and Rhythm above) and clapping rhythms on sight are good preparation for future sight reading.

Learning outcome for Sight Reading

  • The student can clap the rhythm of pieces they haven’t played before

Improvisation and Composition

In First Steps and above in Scales and Chords I introduced you to the Scales, Patterns and Improvs Book.  So I won’t bore you again!  But now the students are learning their pentascale patterns they can use them over the book’s improvisation backing tracks.  I want the student to be brave enough to make mistakes and give it a try.  As they progress we discuss the satisfaction of finishing on the tonic note. This satisfaction crosses over to their compositions too.  I encourage the students to write their own melodies based on the season, or a piece they’ve enjoyed playing.

Learning outcomes for Improvisation and Composition

  • The student has used their scale patterns to improvise over pre-recorded tracks
  • The student has attempted to compose their own melodies

What’s next?

Once the student has gained a sticker on each point on their red “Key Skills” star they get to keep their completed star.  They also get a certificate and a report which shows how they’ve progressed over the period and a summary of all the skills they’ve gained.  A great milestone on the journey to Grade 1 to show they are progressing. Many of the children take them into school and have them awarded in assembly in the same way as other children have swimming badges and karate certificates.

They then get very excited when I hand them their orange “Initial” star and proudly stick it to my music room wall.  The learning outcomes for “Initial” will be a topic for a future blog post.

Have I missed anything?  Why not add a comment!
Express Yourself Piano Star Scheme – First Steps

Following on from my introduction to the Express Yourself Piano Star Scheme

When a student starts with me, I assess them and choose a tutor book to suit their age, learning style and prior experience.  Many of my young starters, age 5 and 6, will start with My First Piano Adventures Book A.  Children aged 7 and over will usually use Piano Adventures Primer.  Both of these schemes start “off stave” and teach by intervals rather than with thumbs fixed to middle C.

Once my students have settled into lessons I introduce them to the Express Yourself Piano Star Scheme.  The stars are colour coded and go up by level and the first level is “First Steps” which is white.  This is for students who are just starting piano and I would expect them to be working through a Primer level tutor book.  This level should take them up to the point where they have been introduced to the stave.

Which essential musical elements do I work on with beginner students?

Pitch

As soon as their first lesson I will start singing with my students.  With the younger ones I use songs from Jolly Music using notes 5 and 3 on the major scale, or so-mi in solfa.  Rain Rain Go Away also works.  It creates a descending minor third which is the easiest interval to sing because children use it in the playground.  Remember ner ner ne ner ner? Ideally I want them to sing too but recently I have had some resisters.  With these students I’ve decided to keep singing myself and not ask them to sing back. I’m hoping soon they will just start singing with me!  With these songs we can start to train their aural skills – a subject for another blog!

Learning outcomes for pitch

  • The student can listen to two melodic examples and identify if they are the same or different
  • The student can identify, by listening, which of two notes (large interval) is higher or lower
  • The student can identify in which direction a melody is progressing
  • The student can play a so-mi song on black keys or a chime bar

Pulse and rhythm

Again using songs from the fabulous Jolly Music we will work on pulse.  We clap, march and bang a djembe along to music,  or singing or chanting.

Learning outcome for pulse

  • The student can march and clap along in time with their teacher

Dynamics and articulation

Dynamics are great fun to learn on the piano.  Especially for little ones.  They love doing monster forte sounds and little mouse piano sounds.  These activities also really help their sense of pitch as you can play high mouse sounds and low monster sounds.  Introducing them to dynamics helps them make their simple pieces so much more interesting without the needing to know very much theory or technique.

Learning outcome for dynamics

  • The student can identify, by listening, whether a melody is played forte (loud) or piano (soft)

Technique

I love the  My First Piano Adventures Books for young children because they introduce good piano technique in such a fun way.  Here is a video showing one of the authors, Nancy Faber, teaching a child a rounded hand shape with the rhyme Stone on the Mountain.  Of course we also talk about the little mouse that lives under our hand.  We wouldn’t want to squash him!!  I get the students to name the mice!

Learning outcome for technique

  • The student knows that they should play with a rounded hand shape

Scales and chords

It’s hard for 5 year old beginners to get their fingers round five note scales.  I do get them on the “Key Skills” level scales as soon as they are able, but in order to get their sticker for “First Steps” I only expect them to play with one finger.  To tie in with the Piano Adventures method I ask them to use finger 2 or finger 3 and brace it against their thumb.  Like the A-OK sign.  This helps them to use their fingertips and prevents their first  knuckle collapsing.

Learning outcome for scales

  • The student can play pentascales in the keys of C and G using one finger

Theory

I don’t start students on formal theory books until they have completed the “First Steps” level.  However key elements such as the time value of notes and keyboard geography can be introduced before the student starts learning on the stave.

Learning outcomes for theory

  • The student can identify the white notes on the keyboard
  • The student understands crotchets, minims, dotted minims and semibreves
  • The student can identify Middle C on the stave

Sight reading

In “First Steps” I don’t include any specific sight reading targets.  These start in “Key Skills”.  However we can prepare for future sight reading targets by clapping the rhythm of their pieces.

Improvisation and composition

I discover many new books and resources from my online colleagues.  The world wide web is a wonderful thing.  One such resource is the Scales, Patterns and Improvs Book.  I don’t use the book much, but the CD is wonderful!  It has backing tracks for practising pentascales to and also backing tracks for improvisation.  At this point all I want the student to do is try.  They can use any notes they like and just start playing.  The results aren’t always pretty but we’re fostering an environment where there is no wrong answer and that having a go is the most important thing.  I take the same attitude to composition.  If they have played a piece they particularly like then I might suggest they write their own version.  Sometimes we use an event like Halloween or a particular weather or animal to inspire their composition.  They notate it as a picture – in any way they like.

Learning outcomes for Improvisation and Composition

  • The student has improvised, using any notes, over pre-recorded tracks
  • The student has attempted to compose their own melodies

What’s next?

Once the student has gained a sticker on each point on their white “First Steps” star they get to keep their completed star.  They also get a certificate and a report which shows how they’ve progressed over the period and a summary of all the skills they’ve gained.  For children this is a really big deal.  It’s a long journey to Grade 1 on the piano and these certificates enable them to show they are progressing. Many of the children take them into school and have them awarded in assembly in the same way as other children have swimming badges and karate certificates.

They then get very excited when I hand them their red Key Skills star and proudly stick it to my music room wall.  The learning outcomes for Key Skills can be found in this blog post