Monthly Archives: August 2014

Solfa Challenge Level 3

Once my students have achieved the Solfa Challenge Level 2 they should be able to perform a collection of simple songs and rhymes, show the pulse and shape of the pitch and also record these two things in a fairly rough and ready way. In Level 3 we will expand on this and start to introduce the concept of quavers. Again, my ideas have come directly or been inspired by Cyrilla Rowsell and David Vinden’s Jolly Music.

Level 3 is split into three sections as you can see from the Solfa Challenge – Level 3 Chart

Section 1 – I can play…

I can play Patacake

I have mentioned before that some students will tap the rhythm instead of the pulse, or some hybrid of the two. I have found playing patacake can help with this. It gives a very visual and kinesthetic guide from the teacher. My own youngest son still manages to patacake the rhythm though, and gets very cross with me when I’m not in sync with him. Still, he is only 5 so there’s time.

I can play the Radio Game

This game is fabulous. Basically you have one person as the radio controller and the others as the singers. You agree on a signal (like opening and closing the hand) for the controller to tell the singers whether the radio is ON or OFF. The singers must sing the song while the radio is on and then be silent when the radio is off. Initially you may want to sing most of the song ON and just turn it OFF for the last line or few words. The tricky bit is when you turn it off and on again in the same song. The singers must continue the song in their thinking voices (silently in their heads) and start singing again at the right place. Some students will start again on the next word as if a CD has been paused, not a radio being muted.

It’s such a brilliant way of practising keeping a steady beat and working on the thinking voice.

I can play Pass The Song

I love this game and my Infant School Choir love playing it too. Basically you split into groups. In a piano lesson it might be just the teacher and the student. Without missing a beat you must perform a song, taking it in turns to sing. Start easy and sing the entire song before passing. Then try singing a phrase each, and finally a beat each. Some students will have trouble with the beat option. They will try and sing a word each. They could use their pulse pictures they will create in Section 3 below, and tap along the hearts with their fingers to help.

Section 2 – I can play on the keys

For each of the four songs we have been working with, the student plays them by ear on the black keys. You can show them how to find the right black keys for so and mi by showing them the “gaps” on the keyboard. Once they can do that confidently they can extend it to white keys starting on C, D or G. Moving to different keys not only demonstrates that songs can be sung in different keys (transposed) and also encourages them to use their ears to find that second lower pitch. Although I have had students who realised they could just count the semitones – which I guess is another useful skill!

It is vital that the students are comfortable singing the songs accurately and that they understand that the songs use two pitches. A high pitch and a low pitch. They need to build on the work they have done mapping the pitch with their hands and on paper to play them accurately on the piano. Many will just alternate pitches on each word instead of each beat (which is the case for these songs but not future ones) so coming off the bench and doing regular revision of the up and down arm movements will be required. Slowly and surely is the way to go.

I personally don’t demonstrate this activity to the student, rather I talk them through it and sing a lot to get them to their goal. If I demonstrate it, they pick it up much faster but I’m not sure that it provides the same learning opportunities.

Section 3 – I can record

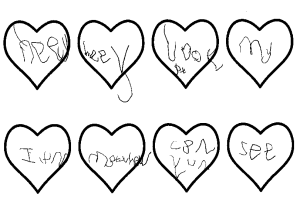
Pulse This starts off very similar to Level 2. We are showing the pulse on paper but this time by writing the words in a set of 8 hearts rather than gluing and sticking. I use a technique I learned from Jolly Music.

1 – The student and teacher sing the song
2 – The student and teacher sing the song and tap the pulse on the hearts
3 – Hopefully the student can now do this on their own
4 – The student taps the hearts and sings in their thinking voice
5 – The teacher taps and the student sings in their thinking voice but the teacher stops on a heart and the student must write the word in the heart
6 – Keep going until all the hearts are full

Make sure you start by filling in all the hearts containing only one word first, then it is easier to fill in the others. If a student keeps getting it wrong you might ask them to sing aloud so you can hear where it’s going wrong. It will probably be that they are singing a single word for each beat rather then keeping with the rhythm they have learnt.

If they have filled all the hearts and missed off a word in the middle – quite a common error – you can sing their song back to them as they have notated it and see if they realise there is a word missing. Another trick is to stop with one heart to go, talk about how many words we still have to fit in, and they should realise that the final heart needs two words, not one.

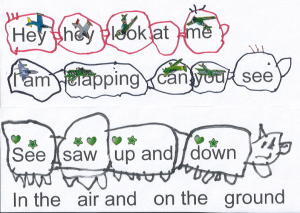
Here is a pulse picture by Matthew (age 5). He changed the words to Hey hey look at me. I am Matthew can you see.

Solfa Level 3 Example 1

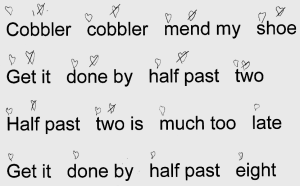
Rhythm Using the same heart beats from the pulse section we can take a look at how many sounds are in each beat. Sometimes there is one sound and sometimes there are two. I start with See Saw as there are only one syllable words to deal with. Cobbler Cobbler can require a little more explanation since Cobbler has two syllables and therefore two sounds.

Next we need to show how we can tap the way the words go, rather than the pulse. So we might have to tap a heart twice if there are two sounds. Hopefully they will know the song well enough to time the taps correctly. When I have done this with older students without the proper preparation we have had some very uneven taps.

Finally we can make crosses underneath the hearts to show which hearts have one and which have two. A confident student may wish to try adding the crosses in the hearts without the stepping stone of the words.

Now we can tap the pulse by tapping the hearts or tap the rhythm (the way the words go) by tapping the crosses. The student can see, hear and feel the difference between pulse and rhythm. An important milestone.

To be continued…
Solfa Challenge Level 2 – Part 2

Here is Part 2 of my guide to my Solfa Challenge Level 2.

Here is a link to Part 1

Level 2 is split into three sections as you can see from the Solfa Challenge – Level 2 Chart. In Part 1 we discussed Sections 1 and 2, I can play and I can show. Here I will describe Section 3 – I can record.

Section 3 – I can record…

We have established in Section 2 that the student can show the pulse and the shape of the pitch with their bodies. Here I ask them to record this. I don’t expect the students to use standard notation at this point. Although many may well be able to.

Instead it’s all about stickers and glue!!

For the pulse I give them a print out of the lyrics (although we can also do this on a white board or hand write it). They then stick a sticker (or make a mark) on the lyrics where the pulse occurs. We work this out by tapping the lyrics with our finger in time with the pulse and work out which word or syllable aligns with the pulse.

For the pitch, this time their lyric sheet is cut up into pulses. We draw a line across a piece of paper and the words or word pairs are glued on the page, either above the line, or below. You can see for both these activities how vital it is for the student to have a clear grasp of the music from Section 2 before attempting these.

Better than explaining any further, here are some examples of pieces some of my students have done. They are all from quite young children, as my adults and older students do similar activities with whiteboards instead.

5 year old boy

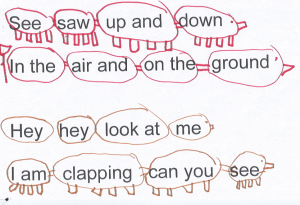
Here is the first attempt at pulse recording from a willful 5 year old boy. In the first example he has made some errors, in the second he insisted each beat get two stickers. Then he personalised his chart with his own imagination. For information, those are pig-trains (don’t ask me!) and each beat is a carriage. Ok so accuracy is missing but he certainly enjoyed the activity and there was certainly plenty of singing!
Solfa Level 2 Example 1

A couple of weeks later, having abandoned the stickers and sticking with the pig-train theme, he produced this. Completely accurate (except that apparently pig-trains have legs). Success!Solfa Level 2 Example 2


7 year old boy

This child is far more serious, he didn’t want to use stickers and instead drew hearts to represent the heart beats of the pulse. You can see where he initially positioned the hearts. We talked about an alien coming down to earth who doesn’t know the song. How will he know where to bang the drum, or clap or time the words? I performed the song the way he had notated it (quite a challenge!) and he immediately grabbed it off me and redid his hearts.
Solfa Level 2 Example 3

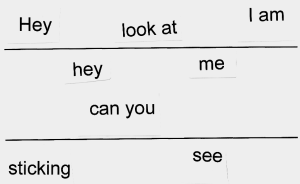
Here is this boy’s pitch picture. You can see he put 5 beats on line 1 and 3 on line 2. This gave us an opportunity to talk about phrasing. And again, we did loads of singing!Solfa Level 2 Example 4


Do you have some cute student solfa pictures? Perhaps you could send them to me and I’ll start a gallery! 😀

Here is my guide to Level 3

Piano Practice Sheets

I have been asked by a couple of people to share the assignment sheets I give to my students. I change my sheets on a regular basis. I like to think it’s to make improvements and that one day I’ll have the perfect system. However, it’s more likely that a change is as good as a rest – for me and my students. I find each time I make a change my students pay more attention to what I write as it feels like a novelty.

Here is my main practice sheet.

Piano Practice Sheets

It is split into four week blocks and each week has a section for pieces, scales and theory, general comments and communication from parents. I use post it notes on the piece itself for more details and targets. There’s also a practice tick box. This tick box often gets ignored though, after the initial enthusiasm has waned. While I don’t want practice to be seen as a box ticking exercise it’s quite helpful to show students and parents that perhaps daily practice might be desirable!?

Perfect Pieces

Over the summer I have developed a new sheet for pieces, to be used in addition to the practice sheet. I designed it for my own son. He’s 7 and is currently working towards his Trinity Initial exam. Students at this level have quite a few pieces on the go at once and it’s hard for them to remember to practice the ones we may not have covered in that week’s lesson.

Perfect Pieces Chart Level 2

I am planning to create a Level 1 version of this sheet for my lower level students. My dilemma with this chart is that it looks like dynamics and articulation are added at the end, when in fact I prefer them to be included from the beginning. However, in the journey to perfection (whatever that is) the accurate delivery of the dynamics and articulation are often the final parts to be perfected. Certainly at this level in my experience.

The trouble with these catch all sheets is that every student is different and every piece is different. It would be nice to create a different template for all the different scenarios but in the meantime this is what I have! It’s not made of stone after all!

I hope you find them useful.

Solfa Challenge Level 2 – Part 1

Once my students have achieved the Solfa Challenge Level 1 they should be able to perform a collection of simple songs and rhymes. In Level 2 we will start to do more interesting things with these pieces. Here is Part 1 of my guide to Level 2.

Level 2 is split into three sections as you can see from the Solfa Challenge – Level 2 Chart

Section 1 – I can play…

I can play Stand Up Sit Down

This is where the games come in. We play the ever popular Stand Up, Sit Down game from Cyrilla Rowsell and David Vinden’s Jolly Music. The game starts simply and becomes more complex as the student becomes more competent with their pitch awareness. The teacher sings either “stand up” or “sit down, and the student must stand up or sit down! Easy right? The pitches sung either rise from so to do’ (dominant to high tonic or G to high C) for “stand up” and descend from so to do (dominant to low tonic or G to middle C) for “sit down”. The teacher starts each instruction with their hands in the ready position by their chest and either moves them up to their head or down to their waist with the direction of the pitch. You can try and trick the student by singing “stand up” when they are already standing up! They think this is hilarious – if they notice!! For those who don’t notice I put a mischievous grin on my face before I do it to give them some warning.

The benefits of this game are to associate up and down with the different pitches. The children are hearing the pitch change, seeing the arms move, physically responding with their whole bodies and also hearing the instructions.

For the second stage of this game the teacher replaces the lyrics with a “doo” sound. So the children no longer hear the instructions but they still see the arms move and hopefully have started recognising the pitch. My mischievous face is used a bit more here.

Finally we remove the arm movements and the children rely purely on their pitch awareness. If anyone is struggling I might use my face to give them clues until they can do it comfortably.

The children love this game and I am definitely the first to get bored! They especially love being the teacher and it can sometimes be quite a challenge to do what they’re expecting. I want to build their confidence but in the early days with some of the students their pitch can be all over the place. Luckily they think it’s hilarious when I get it wrong!!

I can play Guess the Pitch

The second game can be sung or done on the piano. It’s Guess the Pitch. They don’t have to identify the actual pitch – that would be far too challenging at this level. They just need to identify if the pitch is high or low. Sometimes it’s easier for them to hear it sung, sometimes having the massive extremes of the piano is more helpful. As always the key is to make it really obvious to start with and only move to smaller intervals with the most confident. The aim of the game is to get them to label high pitches as high and low pitches as low.

When I started teaching I was surprised how many students had an issue with this concept. Even one of my most musical 5 year olds had it completely the wrong way round. When I corrected her, she thought I was joking and laughed herself silly! So if a student struggles I give lots of extra verbal clues like “Is this sound high like a tweeting bird or low like a grizzly bear?” Gradually those verbal clues can be removed. Now I’m not surprised, why would a student associate high frequency vibrations with high in the sky and low frequency vibrations with low down? It’s only a shared label, the words don’t actually mean the same! Then we expect them to realise that high in the sky equates to the right of the piano and low is the left – and this is before we even get onto notation! If we need to spend more time on this task then it’s time well spent.

Section 2 – I Can Show…

For this section we use some of the two note so-mi songs we learnt in Level 1. The songs have been taken from Cyrilla Rowsell and David Vinden’s Jolly Music. For each song the student must show the pulse and then the shape of the pitch with their bodies.

I can show the pulse

For Pulse I usually start with Cobbler Cobbler. The students are really familiar with this one as we will have been clapping, tapping and marching the pulse from lesson 1 or 2. They achieve their sticker if they can mark the pulse without help and with a steady beat. The biggest hurdle for this task is stopping the student from tapping the rhythm. Cobbler Cobbler is a good starter because it starts with quavers, where the pulse is crotchets. So if you get them started with a good crotchet pulse then they are more likely to succeed. Contrast that with See Saw or Hey Hey (which we also do at this level) which start with crotchets and then have quavers a couple of words in. With these songs the students may start of tapping the crotchet beat but on the quavers they may tap each quaver – which is actually the rhythm.

Marching is a good way of eliminating this, it’s easier to march the pulse than the rhythm. Also patacake can help them get a good sense of pulse. My own youngest son still manages to patacake the rhythm though, and gets very cross with me when I’m not in sync with him. Still, he is only 5 so there’s time.

I can show the pitch

To show the pitch I just mean to raise or lower the arms as the pitch raises and lowers. Just like we did in Stand Up Sit Down. The teacher should show the pitch with the students initially, until they are ready to do it alone. Ideally to achieve their sticker they should be able to perform it alone, accurately and at a lesson where you haven’t already practised together.

For this I start with Up and Down because the first two pitches are labelled within the lyrics. The pitch of all these two pitch so-mi songs swaps on the beat so the arms will be moving with the beat as well as with the pitch change. To help the students you can sing the song first and work out together if the song starts on a high pitch or low pitch. For this set of songs, they always start on the high pitch. It is important to start with the hands in a neutral “ready position” around chest height. If the students start with their hands high, in anticipation of the first pitch, then they may invert the whole melody!

Section 3 – I can record…

to be continued in Part 2